Wednesday, June 30, 2010

The magic hour

No other time holds a sense of magic for my little girl like the hour of dusk. I am reminded of this again and again, as it is without a doubt her most peaceful time of the day, 
for this child of mine is one filled with fire. 
Yet at this hour she is at one with the fairies, fluttering about in a world filled with magic and surrender.
This evening, it was the flowers in the front yard that had her enthralled. And I must say the lilies just in bloom are magnificent, and the scent unbelievable.
These photos don't quite capture the size of these flowers, for they are indeed huge!  
So Kaleena comes running to show me how she has pollinated her face, and she sure had. It took a lot of scrubbing to get that pollen off.
But how precious!


And before she flittered into bed she brought me this beautiful bouquet.
The flower fairies have certainly worked their magic on her.

And I must share yet another beauty..
Look at those tiny little spirals, how intricate, such perfection.
I certainly share my daughters love of flowers, how could one not..

~May your evening be filled with magic~

Green Salve


This green salve is something we have been using since we moved to these mountains and were introduced to it almost 4 years ago. The children love it, as do I, and we use it for any and all skin ailments. Bites, rashes, stings, 
bruises, scrapes and more.
It works wonderfully soothing and is so easy to make.
Inspired by A handmade life, I added dried calendula flowers this time.
Otherwise we added the same herbs as we added to our poison ivy spray.
Lots of Comfrey, plantain and some jewel weed, we also added some dandelion leaves.


chopped it all up, added the dried calendula flowers and poured a bottle of  Grape seed oil over it.
Left it in the oven for the whole day on the lowest temperature.


Then left it to strain over night


melted some wax 


and added the melted wax to the warmed up oil, if the oil isn't warm the wax will separate when added,
and here is lovely green goodness, ready for all those summer itches, scratches and bruises.


~Green Blessings~

Sunday, June 27, 2010

Grow your own Kombucha Mother.

Last year we started brewing our own Kombucha tea, it is such a wonderful fizzy bitter sweet fermented drink with the added benefit of being extremely good for you on so many levels.
Back then a friend gave us a "mother" or SCOBY as the are called, which is the starter culture needed when brewing at home. I did not keep my batch going or I would have still had a mother. (with each batch, the mother grows a "baby", a new mother )
So when I started craving this wonderful drink again I started asking around and could not find an available mother. I asked at the local farmers market, and found one for sale for $20, which was just more than I wanted to spend, so with some research I realized that I could easily grow my own, 
and so I did.
I started with about a quart of boiling sterilized water to which I added two bags of green tea( you may also use black or white tea, but not herbal tea). I boiled the tea bags for a couple of minutes, then turned it off, and let the bags steep for I'd say 15 minutes or so. I rarely follow any recipe completely, and I am sure there are many ways to do this. Then I added sugar, a necessary ingredient for the fermentation process,  I added about 4T of sugar, and the let it cool to room temperature.
Then I poured my sweetened tea into a glass jar, must be glass, and added a bottle of store bought raw organic Kombucha,( The Raw Kombucha can be bought in any health food store) no flavors added, covered with a cloth, cheese cloth or other, and set aside in a warm place out of direct sunlight.


after one week, bubbles started appearing on the surface, a sign that the fermenting is happening


and after two weeks my new mother or SCOBY was ready


this is a look at it from the top


So tonight I started brewing my first batch.
Again I boiled sterilized water and added 7 or 8 green tea bags, like before you may use black or white tea, traditionally black tea is used I believe. Let it steep for about 15 minutes add about 1.5 cup of sugar, let it cool to room temperature, then I poured it into a 1 gallon glass jar, added 1 quart of already brewed live Kombucha ( I used what I had grown the mother in ), and added sterilized water almost to the top of the jar. Then I took my newly grown mother and laid it carefully to float on the top, facing the same way as I had taken it out, covered with cloth, put is back in its dark warm place, and there it will sit for about two weeks when I will pour off my fresh batch and start a new batch, remembering to save a quart for my new batch, plus I will have an new mother to share with a friend.
( I am also working on an experiment to see if I can grow a mother without the use of a bottle of already made Kombucha, I will post the results when I have an answer )
Lovely homemade goodness, I am looking forward!

Under the evening sky


In celebration of the recent solstice we spent a night camping in the yard, and although we did not go far afield, it was a magical evening, one that will not soon be forgotten. It was rich on simple pleasures and closeness.
Kaleena told me several times throughout the evening that this was the "funnest" night she ever had.
We ate rice and beans cooked over the fire, roasted marshmallows , the children burned sticks and used them as pens and played with the wax of the candles for the longest time, 
how fire enthralls these children!
( it is of course always well supervised and respected )
We talked and told stories, and before bed the children danced with the fireflies.
It was for me a sweet reminder of the moments that mean so much in childhood, that creates such beautiful memories, and this from simply pitching a tent in the back yard and sharing a moon lit night under the trees.


story time and sweet slumber..


under a beautiful evening sky


It was a blessed night indeed.
~with love and gratitude~


Friday, June 25, 2010

Glowing ballon lanterns

In preparation for our weekend back yard camp out we decided to make some lanterns.
 This is such a simple project, and we have used this technique many times before, mostly to make little glass lanterns for Michaelmas or for Christmas decorations. Having used all available glass ware in the house for recent jam and herbal medicine making, we decided to use balloons instead.
(although glass lanterns would have probably been better suited for outside use)

(A few tips from this experience, next time I will not glue paper up so close to the knot as it makes it harder to take the balloon out once popped, also while you don't want to thick of a layer of paper, do make sure that there is an ample amount of glue on, at least enough that all paper is wet through, as this makes for a smoother surface and a bit harder lantern shell. the children's had not quite enough glue, and so had a bit more flimsy form, still beautiful though for sure.)


Ingredients are the same whether you use glass or balloons for your lantern;
watered down white school glue, tissue paper and paint brushes, and in this case balloons.


We then added strips of ripped up tissue paper with the glue unto the balloon


and once we had a couple of layers hung them up to dry.


Once dry, which took the better part of the day, we popped the balloon, and ended up with a scrunched up little raisin looking thing, the children did not like that part, yet they are easily straightened out once the balloon is removed. Then I cut around the opening and added a small candle, which of course I watch carefully.


Here they are all lit up, although you cannot really see it, as I haven't quite figured out how to take a picture without the automatic flash popping up (In my defense it is a relatively new camera, and I rarely read owners manual:) ) None the less, the children love their simplicity and warm glow.


Kaleena making a wish before bedtime.

We are looking forward to enjoying the effect of these lanterns around our tent,
and I will surely post pictures of this little event.
I do hope the weather holds up, saturdays forecast says it will, yet right now there is lots of thundering and threatening clouds.
Thanks for checking in,
and have a wonderful day!

Thursday, June 24, 2010

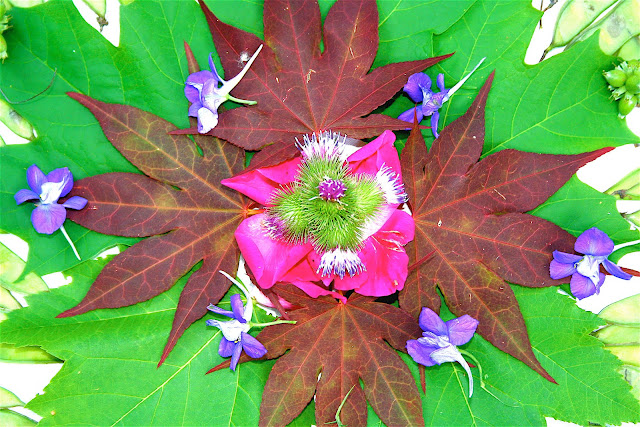
Garden Mandalas

We created amazing Mandalas in the garden today, they were so beautiful, and were greatly enjoyed by the children and myself alike, from the gathering of plant material, to the creating of the Mandalas and in true Mandala style, reminding us that it is the journey not the destination that truly matters, the breaking down of the beautiful creations.

Here are our well loved baskets full of plant beauty


Keenan really got into it, as a three year old I thought he would quickly loose interest, but he stayed on for a long time adding on to his creation


Kaleena, who loves these kinds of activities, made first one and then started over and made another


and here are the different stages of the one I made, I got a little carried away with the camera, but I just adore the progression.


And when we were done creating we gathered up the corners of our "canvas"
and created yet another pile of plant material to start all over again.
Do share if you have, or feel inspired to make beautiful plant Mandalas.


And a beautiful sunflower from our plant gathering walk.
A perfect reminder that summer truly is here.


May your day be wonderfully creative:)